Qubic QS-BT1 Belt Tensioner: One step closer to reality?


The sim racing hardware market is full of choices, and some are more odd than others. The Qubic Belt Tensioner falls firmly into the latter category.

If you have recently watched the Senna Netflix show, you know that one of the most legendary racing drivers in history always had his seat belts fastened extra tight before the race. Original quote from Ron Dennis:
"All racing drivers want to feel part of the car, to such an extent that they don't want to move; they try to lock themselves in. In Brazil (in 1991) Ayrton cut his circulation to his upper body by tightening the seat belts so much, and that is why he subsequently was in a lot of pain on the podium."

This aspect of G-forces in the seatbelt has not been possible in sim racing so far. However, Qubic System now has a product that could change this, even without a motion system! We find out if this is a new, useful and reliable sensor for sim racing, in addition to force feedback wheels and haptic pedals.

I am always amazed by the ingenuity and innovation of the sim racing community and industry - always on the hunt for more immersion! Last year, we looked at the Sensit haptic feedback seat cushions, which can reduce a sim racer's constant visual focus through their vibration signals. Qubic System's QS-BT1 is in the same vein, and we'll start with an overview of what it is, what it does, what it costs, and what you need to install it.

Qubic QS-BT1 Belt Tensioner Price & Contents.jpg


Qubic QS-BT1 Price & Contents​

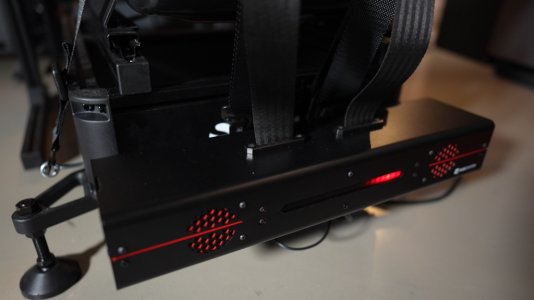
This rectangular box weighs 13 kg, has a two-channel direct-drive motor that can generate up to 41 kg or 90 lbs of force, or 21.5k g or 45 lbs per side. If this seems abstract to you, let me tell you that this is quite powerful, or more than powerful enough! The QS-BT1 is currently priced at EUR 1,390 excluding tax - there is a wide network of dealers, so you can check the website to see who sells it in your area.

To get the system up and running, your rig needs to meet a few requirements: To attach it at all, you need an aluminium profile-based cockpit, such as our Sim-Lab P1X Pro, or one of the compatible motion rigs, such as Qubic's own QS-V20 or the Next Level Racing Motion Platform V3.

Your seat is also essential as it will of course need the shoulder slots for the harness. And they need to be in the right position for your body size and shape to ensure the ideal pulling force without pain. A horizontal line between the slots and your shoulder is optimal, if the slots are a little lower it's just about right. Our Sparco seat in the office is more suitable for smaller people, but my own seat at home, the Circuit II, would have been better for me personally.

Qubic QS-BT1 Belt Tensioner Sparco Harness.jpg


The seat belts themselves are not included, which is a bit of a shame considering the price. Qubic recommends five- or six-point harnesses, ideally with FIA certification. We used 4-point harnesses from Sparco for €120 and that worked well, but there is always the risk that they slip or move upwards.

Qubic Belt Tensioner - Configurable Effects​

Everything is explained well and in detail in the instructions, and we'll get to the setup in a moment. If the simulator's telemetry allows it, the following effects can be applied:
  • Braking
  • Lateral Acceleration
  • Centrifugal Cornering Force
  • Wheel Slip & Wheel Lock
  • Engine Vibrations
  • Rev Limiter
  • Gear Change
  • Side Slip
  • Traction Loss
  • Oversteer
  • Vertical G-Force
  • Pre-impact Protection

This is also the main reason why the Belt Tensioner really surprised me, as at first glance I only expected it to tighten under braking. But it is much finer and more detailed than that, and we'll get to that in a moment. First, I'll tell you how the build and the installation went.

First I sorted everything and checked that it was complete. There are some T-slot nuts and screws included, but the latter were too long to fit on the rig, so I had to use leftovers from our Sim-Lab bags. A trip to the hardware store was necessary to get suitable holders for the side screw points for our harnesses.

Fitting the QS-BT1 main unit to the aluminium profiles using the supplied mounting adapters is not quite as straight-forward, as the unit is a little heavier and the spacing on the left and right needs to be exact. Luckily, the packaging of the Fanatec Clubsport Handbrake V2 gave me the correct height to place it, so I was able to screw it on myself. However, a helping hand is definitely recommended.

Qubic QS-BT1 Belt Tensioner Installation.jpg


(Relatively) Straight-forward Rig Installation​

Make sure that you follow the instructions carefully when attaching the buckles that connect the straps of the unit to your belts. Depending on the nature of your shoulder slots, it may be useful to use the low friction inserts supplied to protect your belts and seat. However, I left them out later.

All in all, this was very straight-forward and took about 20 minutes once the screw points were identified. Finally, there are the cable connections, which are also simple - USB to the PC, a motion lock jumper as we're not using a motion system, and then the power supply. There is an option to connect a Qubic emergency stop switch, but unfortunately this is not included with the standalone product, either.

Technically, the system cannot crush your chest, but there is still a bit of uncertainty because telemetry can do strange things, especially with simulations that are constantly being developed and can sometimes have FFB bugs or other glitches. The fact that the unit has a light signal on the outside like a Cylon from my favourite show Battlestar Galactica is very cool, but it makes me feel more at the mercy of the system.

Qubic QS-BT1 Belt Tensioner Software.jpg


Qubic QS-BT1 Software​

Next, we download the Qubic Manager from the website and switch on the unit. The software won't win any design awards, but it has good explanations for the individual settings and shows you transparently whether the configuration and telemetry of your games is active, including tips & tricks if special settings are required. In AMS2 for example, the shared memory option, which must be set ingame, has to be enabled. Gain, sharpness and deadzones can be set for each individual effect in the SFX area.

Then, it was time for the first test lap and I was blown away, there is no other way to put it. I was immediately reminded of a GT3 taxi ride I had in an M6 GT3 a few years ago, the pressure on my shoulders from cornering and the immense braking maneuvers. And the beauty of it is that it's not about show or pure power or effect, but that this dual-channel engine works very finely and without any noticeable delay.

Qubic QS-BT1 Belt Tensioner Michel Ring Taxi BMW M6.jpg


In addition to the muscle memory for brake pedal pressure, the QS-BT1 also transmits the applied deceleration and acceleration to your upper body, providing the missing G-forces that you can only experience in a real car. Whether it's realistic to have the belts pulling when you change gear, or the left belt pulling more when you take a right-hand corner, remains to be seen - but it's immersive! And it is definitely an extra sensor system telling us what the car is doing.

Qubic QS-BT1 Belt Tensioner Driving.jpg


A Really Special Driving Experience​

A 50% gain setting in braking power was enough for me. The unit itself also transmits some vibrations to the rig and seat, which is a nice side effect. Since I have used this in combination with our Simucube Active Pedals, it's a really special driving experience that gives you a great sensation even without a motion platform. In terms of ABS, tyre slip and TC haptics, an active pedal is naturally a bit more precise and closer to the foot than the Belt Tensioner, so if you have both, they complement each other perfectly. The QS-BT1's background noise is very low, with the main noise coming from the fans.

So, in conclusion, would I buy the QS-BT1 at this price, or in what order would I invest in my rig? You have probably heard that I really liked the Belt Tensioner. However, over 1,400 Euros is still a lot of money. I already have a lot of fun sim racing with a good DD wheel and active pedal. If I had to choose between upgrading to a Simucube Active Pedal Pro for the brakes or the QS-BT1, it would probably be the pedal, as I switch between many car classes and games, I just really enjoy the quick adjustability of the pedal.

The seatbelts are also a bit of a hassle, as you have to buckle and unbuckle them every time, but you get used to it. You could combine this with a buttkicker - it depends on how serious and close you want your experience to be to real driving. If you are still looking for that extra bit of excitement, the Belt Tensioner could be the next step for you.

Qubic QS-BT1 Belt Tensioner Seat.jpg


Qubic QS-BT1 In Flight Sims​

Meanwhile, if you are also into flight sims, you will be happy to hear that the QS-BT1 also works with those - Qubic specifically mentions "high G maneuvers" that the system can enhance with the effects it provides. For flight sims, the following effects can be applied:
  • Positive G-forces
  • Negative G-forces
  • Lateral Accelerations
  • Deceleration/Speed Brake
  • Centrifugal Force during roll/bank
  • Cannon fire/missile launch
  • Flare/chaff dispose

If you have any questions about the belt tensioner, feel free to ask in the comments below!

What are your thoughts on systems like the QS-BT1? Let us know in the comments and join the discussion in our hardware forum!
About author
Michel Wolk
- Joined the OverTake crew in April 2022
- Sim Racing & content creation since 2012
- Petrolhead, Rally fan, Subie driver, Nordschleife addict, Poké Maniac, Gamer, 90's kid

Current Rig Setup:
- Sim-Lab P1X Pro Cockpit
- 3x ASUS TUF Gaming VG32VQR
- RTX 4080, AMD 5800X3D, 32GB RAM
- Simagic Alpha Ultimate
- Simucube ActivePedal Pro Brake
- Sim-Lab XP1 Throttle
- Moza HBP Handbrake

Comments

The concept of this is great, but they are still too expensive. A DIY route is much more appealling atm though.
 
Not this, but it got an honourable mention - the butt-kicker setup.

But... (no pun), don't go for the mega-expensive kit. Here in Australia, at least, it's ridiculously priced.

A Dayton audio vibrating 'speaker' (it's just the magnet) and a low-cost usb sound card and amp, and it's a very easy installation that works well with Sim Hub.

For my AuD$250 all in I would replace it in a heartbeat if it failed. Not sure in the legitimacy of posting (my) blog posts here on how I made it all work but if you do some research it's easy enough to figure out.

Edit: Butt-kicker is some AuD$600+ for reference.
 
Last edited:
I looked into them when they first hit the market, they are asking $3000 for them locally.

So, that's a no for me.

I like the concept, and I'm sure the quality is there, But I'd put that money elsewhere.
 
When I saw the picture I thought.. Now I've seen everything.. how many more ways can they think to milk the sim racing fanatic... but then, reading the article.. actually sounds like it could be rather effective. Nice article, very interesting. (Still not buying one :) )

BTW, I had a buttkicker years ago after reading all the hype (Had to buy from NZ in order to get it in AUS). I personally was very disappointed. Just a vibrating lump whose vibrating frequency had no relationship to engine revs frequency.. just amplitude changed not frequency. I got rid of it.. so just goes to show.. each to their own when it comes to immersion
 
Last edited:
I gave away my buttkicker system when I went to a vibrating seat cover.

Then the vibrating seat cover broke, so I set up a system using those dayton components, which was so underwhelming that when I last done some work on my rig I disconnected it, and I just left it disconnected.

Only ever used these systems for engine revs (and even then, only for idle and when hitting the rev limit) and kurbs, and the seat cover was imo the best option, but damn uncomfortable to sit on.
 
Last edited:
As Gametrix Jetseat user combined with Simhub i agree Metla, seat covers FTW!!!
And you can buy one without sell any internal organ!.
 
I'm hoping that someone builds a seat with the haptics built into it, rather than a cover. That way some level of comfort and durability would be maintained.

But going by simracing logic, putting $200 worth of haptics into a $400 seat would probably retail for $3000
Pretty much the SimXperience GS-5. Yes, it was done years ago :D
 
Pretty much the SimXperience GS-5. Yes, it was done years ago :D
Thats an interesting design, a bit overkill in regards to what I had in mind as I only was really considering haptics. Though even after watching the video I'm not quite sure what it is.

And I just had to share my screen for a video call and now all the senior executive team know what I actually do all day. Watch youtube videos of obscure sim-racing gear.
 
Last edited:
  • Haha
Reactions: pai
BTW, I had a buttkicker years ago after reading all the hype (Had to buy from NZ in order to get it in AUS). I personally was very disappointed. Just a vibrating lump whose vibrating frequency had no relationship to engine revs frequency.. just amplitude changed not frequency. I got rid of it.. so just goes to show.. each to their own when it comes to immersion

Interesting. It's certainly possible to overdo it.

I ended up with:
  • Low revs, idle - so sat in the pits my car had a lumpy cam feel to it. Immersion only
  • Ripple strips - reasonable vibration- my main informative thing.
  • Gear change - it just thumps once, immersion, but awesome on say a gt3 car.
  • Brake lock - super high frequency - has really helped with over-braking. Hardley ever happens now
  • Bumps on road - but reeally only if they're huge, this is the one that's super easy to over do. Bathurst in just about any game is the one to use for test and tune on this one.
And I think that was it. Mostly immersion, some quality feedback around road edges and brakes, but with all of then above it is pretty busy. Any more and I think it would be too much for sure.

All this on one, mounted direct to frame for extra fidelity.
 
I know a few guys (as in discords etc) that have them and like it a lot but I have to say that one area that I think we wont see commercial guys come in to is an off the shelf that has active lap belts.
For about five years I had a diy active belt that didn't have left and right and with the design I did, it didnt have gearing and therefore not enough torque to drive lap belts.

When I finally made the upgrade a little while ago I found that the independent left and right was very nice, but the independent left and right as well as that for lap belts was incredible.. I still remember being psyched when I went through some high speed esses and felt sustained g through them all.

I found that when both the lap and the shoulder pulled while you were in the car the brain did a crazy good job of filling in the rest to make it seem like your whole side was going in to the seat rather than the belts on just a couple of points. I never got this from just the shoulder belts.

The con is that with all the commercial ones you can just mount it and route two belts through the seat holes and off you go. It can go from not too bad to complicated to route the lap belts so that they dont interfere with the rig and create friction that interferes with the operation. So because of the added complication and each rig is different I don't think we will see support for lap belts from companies like qubic.. of course you could rig something up yourself anyway....

I went with a members design from here, Hoernle, and it has been fantastic, costing half the amount but giving much more where it counts. Anyone that can do any diy, should have a look, probably many people that have made an sfx are aware of the diy belt options, you dont have to have any other motion to get it going. Just make the belt and choose your software, simhub, simtools, simfeedback etc.
 
Last edited:
My hack job is to have my motion rig set up so violently that hitting an S-bend at speed first throws me one way, then snaps backs and tries to eject me in the other direction, then when I hit the throttle, it rears up like an mx bike getting on the pipe. I think it's a sway-acceleration and a surge setting that I probably shouldn't have messed with.

Feels like there is no shortage of G's.

I really need to get some seatbelts just to take some of the hard work out of the equation.
 
Last edited:
Well they can charge that much due to so few models on the market, hopefully MOZA has one in development, hoping <$500.
 
OverTake
Premium
My hack job is to have my motion rig set up so violently that hitting an S-bend at speed first throws me one way, then snaps backs and tries to eject me in the other direction, then when I hit the throttle, it rears up like an mx bike getting on the pipe. I think it's a sway-acceleration and a surge setting that I probably shouldn't have messed with.

Feels like there is no shortage of G's.

I really need to get some seatbelts just to take some of the hard work out of the equation.
Might not be a motion system involved in what this reminds me of, but I couldn't help but think of the OverTake Indy 500 km last year when my wheel base tried to do something similar to me after a biiiig slide. The flatspot FFB effect was so bad I had to pit 😄
 
It is interesting to know how this thing can simulate negative g-forces.
 
Looks interesting but the price is very special.
Furthermore the mounting position is the same as for my buttkicker (gamer 2).
For those who are disappointed by their buttkicker(s). I use my single buttkicker under the seat for lateral and longitudinal slip (and a little bit for surface). Very satisfied with it.
 
ERacing labs do one that's practically free in comparison, Though it pulls on both belts at once. Though I wonder if Simhub could run two of them interdependently.


eracing labs.jpg
 
ERacing labs do one that's practically free in comparison, Though it pulls on both belts at once. Though I wonder if Simhub could run two of them interdependently.


View attachment 819134
If they are driven by a single motor (looks like they are), it's impossible to separate the effects.

In my mind, the cheapest way of doing this is using motors (not servos, position not required for this application) that move the belts through pulleys, so torque is multiplied in a linear movement. You wire an Arduino and a power output module for each motor. DC motors and PWM signals should get it done, and can be easily programmed with SimHub, zero coding knowledge required.

Only problem, as stated before me, is that you need to put a good bit of thought in the mechanical design and how to mount them on your seat and frame. The thing about lap belts got me thinking even more, it's something I will definitely bear in mind when it comes the time to tackle this.
It runs off a actuator, Same as they use to move rigs around. I was thinking that it would be possible to run an actuator for each belt, and let the software work it out.
 
It runs off a actuator, Same as they use to move rigs around. I was thinking that it would be possible to run an actuator for each belt, and let the software work it out.
With independent outputs, yes, it's possible. Actuators with the actual power for delivering the desired strength of effects are not cheap, but they would be easier to install in most seats.

A bespoke solution with a bucket seat, harness, motors and pulleys, ready to be mounted on FIA type brackets should be possible for a manufacturer, at a price below the device featured on this article.
 

Article information

Author
Michel Wolk
Article read time
7 min read
Views
3,853
Comments
26
Last update

With WRC leaving EA/Codemasters :Who will be blessed with the new WRC license?

  • Sabre

    Votes: 13 1.9%
  • KT Racing

    Votes: 61 8.8%
  • Milestone

    Votes: 87 12.5%
  • The Last Garage

    Votes: 11 1.6%
  • BeamNG

    Votes: 135 19.4%
  • iRacing

    Votes: 107 15.4%
  • Straight4 Studios

    Votes: 8 1.1%
  • Bugbear Entertainment

    Votes: 25 3.6%
  • Motorsport Games / Studio 397

    Votes: 61 8.8%
  • Kunos Simulazioni

    Votes: 98 14.1%
  • Reiza Studios

    Votes: 67 9.6%
  • Other (add in the comments below)

    Votes: 23 3.3%
Back
Top